Wednesday, November 9, 2011

Bird Nest Snack Cups

The quintessential reason that I blog is to chronicle our journey as a family with backyard chickens.  A close second is being able to inspire others.  Teaching is a noble profession and one I highly revere.  Each month, from November to April, I lead a program with my fellow Master Gardeners at our local library that reaches "Little Sprouts" from the ages of 2-7 years old. We read books, sing songs and complete a hands-on activity at each class that has something to do directly or indirectly with horticulture.  The theme for the evening not too long ago was all about birds.  We read three wonderful books: Birdsongs by Betsy Franco, Bluebird’s Nest written by Dorothea DePrisco and illustrated by Jo Parry and Inch by Inch by Leo Lionni. 

You can find so many great books about birds at the local library.  Our library has a book sale twice a year and I always find a book or two for the girls about chickens, chicks, hens or roosters.  If you are thinking about raising chickens with your family, consider doing a little research beforehand like we did.  Read some chicken themed books together.  There is no better way to spark interest and excitement than with a great book!

Since spring has sprung here in northcentral Pennsylvania (and is feeling more like summer!), I wanted to share a fun recipe that we used for the evening's snack. 
It was very tasty!  I highly recommend substituting the Kashi brand cereal because it tastes incredible!  How much fun would this be to make for a spring birthday celebration or Easter party?  It's so easy that it would make a great afternoon snack for your little bird lovers.  I adapted this recipe slightly from the blog The Adventures of Bear.

Recipe for the bird's nest snack:  
2 cups shredded wheat biscuits  (I used Kashi's Island Vanilla cereal)
1/4 cup coconut
1 tablespoon brown sugar
1/4 cup melted butter
grapes
muffin liners

Directions:
Crumble the shredded wheat biscuits into a mixing bowl. Use a spoon to stir in the coconut and brown sugar.  Pour the melted butter over the shredded wheat mixture and mix together.  Line muffin tin with liners.  Press the shredded wheat mixture into the lined cups.  Bake in a 350 degree oven for 10-15 minutes until crisp and golden brown.  Let cool. Remove from muffin tin and fill the nests with grapes as eggs.  Makes roughly six nests.  Enjoy!

Sunday, May 22, 2011

Sharon Lovejoy's Grimy Hands Girls' Club Update!

So I received a wonderful little package in the mail from Sharon Love joy last month and I'm so excited to share with you the contents:
I received a packet of Italian Pesto Basil seeds from Renee's Garden, a nice coupon to Renee's Garden to buy more seeds and six note cards illustrated by Sharon herself tied together with a rustic-looking purple string!  I cannot wait to construct my first raised bed with herbs!  I will be giving the basil a try!
Sharon Lovejoy is an accomplished author, illustrator, lecturer and design consultant.  I would love to hear her speak someday!  She also is a blogger for Lowe's Creative Ideas.  Check her blog out here.  She has written so many inspiring books that have given me a plethora of ideas for gardening with children. 

Friday, March 25, 2011

Gardening with Grandma

Smells as beautiful as it looks!
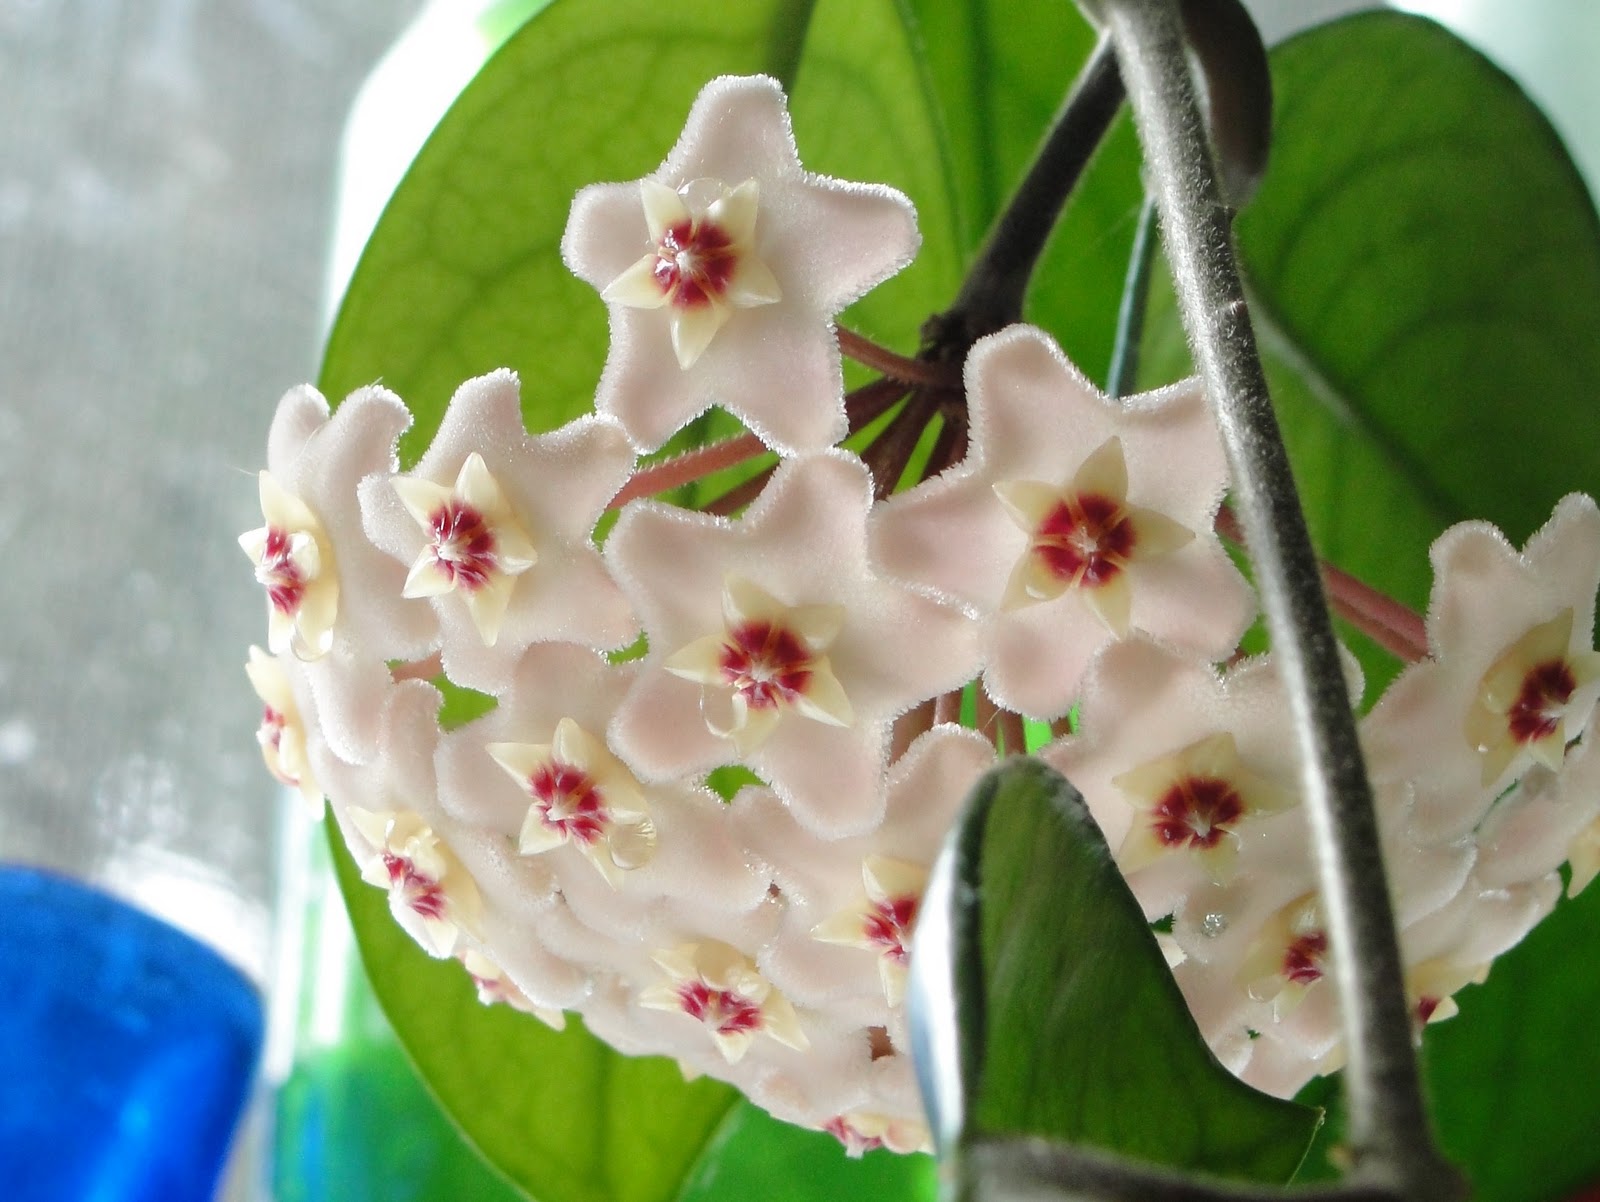
Spring is coming, I know it! It just has to, right? There's ten inches of snow of the ground, how can spring be right around the corner?  One of my most adored verses and my adopted mantra keeps me hopeful: "Nature does not hurry, yet everything is accomplished" was said by Laozi. I didn't have to try to hard to see spring.  My beautiful hoya is blooming despite the snow!
My hoya is the most coveted plant in our home. It was given to me by my grandmother when she moved to an apartment in 1999. I can still remember how she let it hang around the window near the back door of her basement. It now sits in my kitchen and is thriving. I've never seen so many blooms! It sweetens the kitchen with it's perfume and the clusters of blooms are stunning. I've been thinking a lot about my grandmother these past few days. Her health has taken a turn for the worst after fracturing her hip.  She's also suffering from Alzheimer's. Right now, she's in the hospital recovering, so I'm taking her the hoya blooms this weekend to cheer her up.

Hoya in the kitchen
I am blessed that my grandmother loved to garden and took the time to share that love with me.  She always had a large fenced-in veggie garden every summer. It was so much fun to help her in the garden. She'd grow morning glories every year and let them run through the chicken wire fence. Those soft, delicate blooms would welcome me into her garden.  This year, I've purchased 'Grandpa Ott' morning glory seeds so they can climb the chicken wire fence surrounding our veggie garden. I'm so excited to start the seeds and get growing! Recreating the magic of my grandmother's garden is pure nostalgia for me and inspiration for my two little girls!

Saturday, March 5, 2011

Little Sprouts: Vermicomposting

This is an awesome activity to try with your children during those cold winter months.  If you're successful at vermicomposting, then you'll have some wonderful compost for your garden or potted containers come springtime!

Notes: Uncle Jim's Worm Farm is the most affordable place I could find that carries red worms.  I've provided links with the books and Uncle Jim's Worm Farm.  Worms can be purchased via Amazon.com or directly at their site (see direct links below).  You will only need about 10-15 worms per bottle, so make sure you have a plan for the excess worms you're purchasing, since the smallest amount is 250 wrigglers!

Tuesday evening was brimming with squirmy fun and excitement!  Master Gardener Bonnie Rogers showed each Little Sprout how to make their own tabletop vermicomposter (fancy word for worm composter) to take home.  Compost is wonderful for the garden and it is basically plant matter that has been decomposed and recycled as a fertilizer and soil amendment.  We read some fun books, one called Wiggly Worm by Betty Ann Schwartz and illustrated by Brenda Sexton and Compost Stew by Mary McKenna Siddals and illustrated by Ashley Wolff (I erroneously reported to you for the last note that we read this last meeting).  Our evening snack was dirt cups with chocolate pudding, crushed Oreo cookies and gummy worms and slugs!  Master Gardener Bonnie explained what worms do to enrich and aerate the soil and how they help our plants grow healthy and strong roots.  We also learned the do's and don'ts for composting kitchen scraps.  Each Little Sprout was given a pre-assembled compost container, which were made out of two, two-liter soda pop bottles. 


Each Little Sprout went through seven stations to complete their vermicomposter.  The first station they were given sheets of paper and ripped them into small pieces.  Next, they soaked their torn paper into a bucket of water and squeezed out the excess water and placed it into their composter.  Then, they added top soil (important to note that you cannot use potting soil for this step for the livelihood of the worms!).  We had a large bin with worms inside and one of our Girl Scout helpers from Wellsboro Cadette Troop 755 grabbed handfuls of worms and gave everyone the opportunity to pick out the worms for their composters.  It was exciting to watch the kids pick out their worms.  Little Sprout Emma's mom told me after the evening's events she shared with her mom during the car ride home, "First I didn't like worms. Then I learned about them. Now I like worms!"  Now the Little Sprouts can watch the worms break down kitchen scraps.  Each Little Sprout was charged with the duty of adding their leftover kitchen scraps and keeping their plants watered.  There are plants in the top of the composter and when watered, this trickles down to decompose the scraps and keep the worms happy.  The last stage of the composter collects the "compost tea" at the bottom which they can re-use to water their plants, since it's rich in nutrients that plants love!  So many wonderful lessons are encapsulated in this one little activity!  I already see the enthusiasm and success of the vermicomposters at home.  Our Little Sprout, Ara, wanted to save some of her dinner salad for the worms last evening.  This project is a brilliant way to teach children about composting with worms and is an excellent technique for recycling food waste!  Did you know that worm castings in the home garden often contain 5 to 11 times more nitrogen, phosphorous, and potassium as the surrounding soil?  The Little Sprouts learned that worms really do a lot to help our gardens grow well.  I'll be posting a worksheet on the Little Sprouts Facebook page that shows how to make one on your own. We also have pictures and videos posted as well:


Special thanks to Master Gardeners Kathy Odenweller, Lori Redell, and Ann Vayansky for assisting.  Thanks to the Wellsboro Cadette Troop 755 Girl Scouts Ashleigh Abplanalp, Shyann Foreman, and Katie Pacific and co-leader Renee Rogers for their assistance at the evening's program.  Thank you as well to Master Gardener Bonnie Rogers for leading the evening's class and donating the red worms, top soil and all the rest of the supplies for making the vermicomposters.  As always a debt of gratitude must be paid to the Friends of the Library, whose monetary support makes these classes possible and FREE for every Little Sprout!


On the 8th of March, Little Sprouts will learn about bulbs and how to plant them! We'll have tulip bulbs for everyone to plant into peat pot containers donated by the Tioga County Penn State Master Gardeners. Each Little Sprout can take their pot home and watch their bulbs grow and bloom. We'll munch on delicious granola cookies while we listen to some really great books all about bulbs and how they grow. We have three new books that the library has purchased for the evening and hope we'll have time to read them all:  Tulips by Melanie Mitchell, How Tulips Grow by Joanne Mattern and From Bulb to Daffodil by Ellen Weiss. By the end of the evening, all the Little Sprouts will have a basic understanding of the life cycle of a bulb.  Following the class, the books will be available for check out.
Click here to download the instructions for the vermicomposter:
http://www.scribd.com/doc/52807419

Sharon Lovejoy's Grimy Hands Girls' Club!


Sharon Lovejoy


I received an invitation to join Sharon Lovejoy's Grimy Hands Club!
http://www.sharonlovejoy.com/CultivatingWonder/Educational_Resources.html
I'm super-excited to join this club!  Sharon has written so many wonderful books about gardening with children.  I highly recommend her books!


Tuesday, February 22, 2011

Making Wiggly Gelatin Earthworms

Gelatin Worms Made from Larger Drinking Straws
These worms, as pictured, were made from McDonald's and Wendy's drinking straws we had leftover.  They make considerably bigger, juicier worms for slurping satisfaction.  This is a great snack if you are doing a garden-themed project with the kids.  This is definitely a major undertaking, but are sure to be a hit with your little ones!

Ingredients:
Plastic, flexible drinking straws, 80-100
Clean, 1 quart beverage container (half and half, orange juice or heavy whipping cream container) with top cut off.
6 ounce package of raspberry gelatin mix
3/4 of an ounce unflavored gelatin (three packages in a 1 ounce Knox box package, so use three of the four packets)
3 cups boiling water
3/4 cup heavy whipping cream
Green food coloring (about ten drops).  Green gel food coloring works well too, give a couple good squirts.
Fully Extend Flexible Part of Straw
Directions:
Beforehand, fully extend the flexible part of the straws.  Place the straws in the empty heavy whipping cream container with the flexible region at the bottom of the container.  Pack the straws in snugly.
1. In a bowl, add the flavored and unflavored gelatin.
2. Boil the water and add to the bowl with the powered gelatin.  Stir with a whisk until completely dissolved.
3. Do not add the heavy whipping cream until the mixture has cooled for at least fifteen to twenty minutes or you can place in the fridge for ten minutes to save some time.  Once cooled down, stir in the cream and then add green food coloring, stirring until it resembles a earthworm color.
5. Using a container with a spout, like a measuring cup or batter bowl, fill with the mixture and pour into the container holding the straws.  This is best done in a clean sink in case you spill some. 
Enjoying Tasty Worms
6. Take some wax paper to cover the straws.  Hold the wax paper in place with a rubber band.  Allow the gelatin to chill in the refrigerator overnight.
7. Simply tear the carton away from the filled straws. Pull straws apart. Run hot tap water for about two to three seconds over 3 to 4 straws at a time. Starting at the empty ends, push worms from straws with rolling pin, or use your fingers pinching the straw and running your fingers down the length of the straw to slide them out onto trays or cookie sheets lined with wax paper.
Some will break, but broken worms taste just as good! Chill them again, covered in the refrigerator for 2 more hours or up to two days.  
To serve:  Add the earthworms to your dirt recipe for a realistic worm treat or pair with fresh fruit like sliced kiwi and grapes for a delicious snack.  Worms will hold at room temperature for about 2 hours.